Initial Server Setup with Ubuntu on Digital Ocean
In this tutorial we will setup a Ubuntu Server on Digital Ocean cloud and do some essential tweaks.
Setup a Ubuntu Server on Digital Ocean
Spinning a server on Digital Ocean is pretty straightforward. All we need to do is to visit the Digital Ocean dashboard and then the "droplet," what they call it, and set some specifications.
In the top right corner, click "Create Droplet.".
Most of the pre-configured options shown on the page are pretty good. However, I would suggest you to pick the latest Ubuntu LTS image such as Ubuntu 24.04 LTS, CPU option: Normal and RAM: 1 GB. You may also select the Backup plan @ 20% of the cost of the server.
An authentication method is required. You may choose between SSH Key and Password. SSH Key method is highly recommended among Sysadmins however you may also use a password to login to the root user.
In this tutorial we will use the password method, since we will soon disable the root and create another user with SSH.
You may also want to enable "Add improved metrics monitoring and alerting," which is free.
Once you are satisfied with the configuration, click on
Log in with Root and create another user with admin privileges.
Login with root
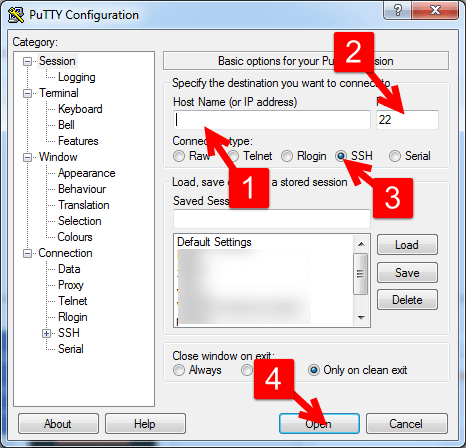
To log into your server, we need a tiny software called PuTTY. It’s free and can be downloaded from here. (Simply download PuTTY for For Windows on Intel x86. It will work fine on any Windows OS. Linux and Apple users do not need PuTTY.

Open PuTTY (if on Windows) or any other SSH client and log in with the username root and the password we set while creating the droplet.
Create another user with admin privileges
Run the following command to create a user
adduser billWhen asked, type and re-type your password. You may skip other details by hitting enter. Now, we will grant bill the administrative privileges. Run
usermod -aG sudo billLogin with newly created admin user
Now, open another PuTTY window and try to log in with our newly created user billIt will ask for a password, and hopefully we may be able to log in to the droplet.
Now we may want to update the server with the following command:
sudo apt update && sudo apt full-upgradeThis will update the server. While updating, a few questions may be asked by the terminal. You may use tab and space to proceed further.
Let's reboot the server with the following command:
sudo rebootor reboot (if using the root user). Upon reboot, we need to log in to the server again. It's safe to close the open PuTTY terminals.
Disable root user
After rebooting, log in with the username bill and the password. After a successful login, let's disable the root user. We may no longer need the root ever. 🤞
sudo nano /etc/ssh/sshd_configRun the above command to edit the sshd_config file. Now find the following line:
PermitRootLogin yes
and change it to
PermitRootLogin no
Now hit Ctrl+x ⌨️ and hit enter ⌨️. After saving and exiting the text editor window, run the following command to reload sshd:
sudo systemctl restart sshdWe have now completed the initial server setup. Now, we may install LEMP Stack, NodeBB, or anything that may be required.